Sunday, January 6, 2013

Creating a Database Availability Group using Exchange Management Shell

Database Availability Groups (DAGs) are the foundation of high availability and site resilience in Exchange Server 2010. Using DAGs, we can create a group of up to 16 mailbox servers that contain a set of database copies providing redundancy for mailbox databases. If a mailbox server in a DAG fails, its active database copies can be mounted on another server in the DAG.

DAGs can be designed in several ways. You can deploy a simple configuration, with just two DAG members in a single site. You can also do more advanced configurations, using multiple servers using separate physical sites.

In this post, I am going to create a simple two node DAG using mailbox servers located in a single site. The entire process will be done in Exchange Management Shell from start to finish – keep in mind you can also use EMC to create and manage DAGs, but using Exchange Management Shell gives us a little more control.

Considerations

Here are a few requirements and recommendations about DAGs that need to be taken into consideration before we get started:

• DAGs can run on Exchange 2010 Standard or Enterprise – your DAG members can be a mix of these Exchange versions.

• DAGs must run on an Enterprise OS – Since DAGs utilize Windows Failover Clustering, you need to use Either 2008 Enterprise or 2008 R2 Enterprise. All members of a DAG MUST run the same OS, don't try to mix 2008 and 2008 R2.

• Use at least two NICs in each DAG member – This is not a requirement, but a best practice. Use, one for the MAPI network and one or more for Replication. Using at least two networks enables the DAG members to distinguish between a server outage and a network outage.

• DAG networks must match – Make sure the network configuration is identical from one DAG member to the next. For example, if you are using three NICs on your first DAG member then you need the same amount on the remaining servers defined with the same networks.

• DAG NICs should be on seperate networks – Each NIC should be in its own network subnet \ VLAN.

• Use Gigabit Ethernet NICs – This almost goes without saying, but obviously is for the sake of performance.

• High Latency is bad – DAG members do not support round trip network latency greater than 250 milliseconds (ms).

• File Share Witness (FSW) can be hosted by any server in the domain – Just make sure that if your FSW is not an Exchange Server that the Exchange Trusted Subsystem group is in the local administrators group

• Each DAG needs an IP address – This can be statically assigned, if it is not, it will attempt to obtain an address via DHCP.

The Lab Setup

For this example, I am going to use a total of 4 servers within a single Active Directory site. One Active Directory Domain Controller, an Hub\CAS server and two mailbox servers. The relevant settings for the mailbox servers are as follows:

Server Names: MB1, MB2

MAPI Network: 172.16.23.0/24

Replication Network: 10.1.1.0/24

Create the DAG

The first thing we need to do is create the DAG. To do this, we use the New-DatabaseAvailabilityGroup cmdlet, specifying the name of the DAG, the name of the witness server, the local path to the witness directory on the witness server and the DAG IP address:

New-DatabaseAvailabilityGroup -Name DAG -WitnessServer HC1 -WitnessDirectory C:\FSW -DatabaseAvailabilityGroupIPAddresses 172.16.23.100

As you can see from the command, my witness server is named HC1 – this is the Hub\CAS server. I did not manually pre-create the C:\FSW directory, this will happen automatically in the next step when we add the mailbox servers to the DAG.

Adding Mailbox Servers to the DAG

Now that the DAG has been created, we can add the mailbox servers to the DAG. We use the Add-DatabaseAvailabilityGroupServer cmdlet to add servers MB1 and MB2 to the DAG:

Add-DatabaseAvailabilityGroupServer -Identity DAG -MailboxServer MB1


Now that MB1 has been added, we add MB2 to the DAG:

Add-DatabaseAvailabilityGroupServer -Identity DAG -MailboxServer MB2


Managing DAG Network Replication

The DAG networks we have configured on the DAG members are automatically added to the DAG when running the Add-DatabaseAvailabilityGroupServer as DAGNetwork01 and DAGNetwork02. We can confirm this by running the Get-DatabaseAvailabilityGroupNetwork cmdlet:


As you can see in the screenshot above, our MAPI network (172.16.23.0/24) has been assigned to DAGNetwork02, whereas the Replication network (10.1.1.0/24) has been assigned to DAGNetwork01 and both networks have replication enabled by default.

It's a good idea to have DAG replication enabled on multiple networks. Keep in mind, you could actually add a third replication network to this configuration for increased redundancy. If you need to disable DAG replication on a network, you can use Set-DatabaseAvailabilityGroupNetwork with the ReplicationEnabled parameter set to $false.

Adding Mailbox Database Copies

The final step is to add a mailbox database copy to the DAG. We currently have a database named DAGDB1 mounted on MB1. We'll use the Add-MailboxDatabaseCopy cmdlet to add a database copy to server MB2.

Add-MailboxDatabaseCopy -Identity DAGDB1 -MailboxServer MB2 -ActivationPreference 2


That's it, we now have a working DAG with a database copy

Thursday, March 10, 2011

Dedicated Active Directory Sites for Exchange

Isn't it the dream for every exchange administrators to have dedicated DC/GC servers for Exchange servers only? Our goal is simple we will dedicate GC for exchange server in enterprise environment. Pointing DS access to the DC's is not good enough. Those of you experts know already the meaning of Multi Master Replication model with AD 2000 and 2003 and how it works.

Exchange 2003 servers can benefit from an Active Directory design that utilizes site architecture to isolate Exchange. This is best achieved through creating a dedicated Active Directory site which contains both Exchange 2003 servers and Global Catalog servers that are dedicated to the Exchange DSAccess process. The potential benefits of this architecture are as follows:

- Reduction of Global Catalog overload potential through isolating Exchange messaging traffic and processes from the remainder of the environment by using dedicated Global Catalogs.

- Increased performance for Exchange LDAP queries through Global Catalogs that are dedicated to the Exchange DSAccess process.

NB: This assumes that you have the right number of GC processors to Exchange processors and a well connected network.

- Easier Management and monitoring of the Exchange environment due to segregating out of non-Exchange processes.

NB: However, this segregation will increase the number total number of domain controllers in your environment

- Increased performance for non-Exchange LDAP and directory services processes due to Exchange process segregation.

NB: This assumes that you have enough GC’s to service non-Exchange traffic

Excessive LDAP Read and Search Times can have a negative impact of the ability to service messaging requests. This could include:

- Impact to mail routing (for mail bound internally and externally)
- Impact to Client Ambiguous Name Resolution requests (i.e. address lookups DL expansions etc)
- Impact other functional processes, login authentication for resources (i.e. calendar and PFs) DL access group Membership
Follow the simple steps below to get to work done.

SRV resource records

Specifies the Priority field in the SRV resource records registered by domain controllers (DC) to which this setting is applied. These DNS records are dynamically registered by the Net Logon service and are used to locate the DC.

The Priority field in the SRV record sets the preference for target hosts (specified in the SRV record's Target field). DNS clients that query for SRV resource records attempt to contact the first reachable host with the lowest priority number listed.

To specify the Priority in the DC Locator DNS SRV resource records, click Enabled, and then enter a value. The range of values is 0 to 65535. If this setting is not configured, it is not applied to any DCs, and DCs use their local configuration.

To prevent clients from discovering a server (maybe the PDC emulator), increase its priority. To lessen the likelihood clients will choose it, lower its weight.


Tuesday, July 13, 2010

Exchange 2010 DAG Single Copy Alert Script Released

Exchange team released an important monitoring script called CheckDatabaseRedundancy.ps1 to the Exchange Team blog. The script monitors the redundancy of replicated mailbox databases in a DAG by validating that there is at least two configured and healthy and current copies, and it generates alert events when only a single healthy copy of a replicated database exists (e.g., a ‘single copy alert’).

It is recommended to run this script regularly, as part of your normal monitoring operations. This is especially critical in JBOD environments. It is very important that all customers monitor for situations in which database redundancy is compromised so that they can immediately take action to restore database redundancy and avoid catastrophic data loss.

More information can be found at http://msexchangeteam.com/archive/2010/05/20/454976.aspx

Monday, July 12, 2010

New Exchange 2010 Features

Here's a short list of some of the new features in Exchange 2010. This is certainly not a comprehensive list, but gives you a flavor of the many enhancements.
  1. Built-in e-mail archiving, with full OWA and fat client access.
  2. Support for 10+GB mailboxes
  3. Shows OCS contacts and can send basic IMs via OWA
  4. Text preview of voicemail messages
  5. Create your own personal auto attendant and configure complex routing rules.
  6. Auto-complete cache is now server based so it works from OWA, fat clients and mobile devices.
  7. Federated calendaring for external business partners.
  8. No more SCC, SCR, SCC, LCR, a new single HA method that supports 16 copies of each database called DAG (Database availability group).
  9. Mailbox role can now host all other Exchange roles (except UM).
  10. Users remain online during mailbox moves.
  11. Role-based administration: Define a role, scope the role, assign users to the role.
  12. Self-service options for creating/managing DLs, personal data, etc.
  13. 70% reduction in IOPS from Exchange 2007.
  14. Transport based rules for automatically applying RMS policies to e-mail.
  15. Full OWA premium experience with Firefox and Safari
  16. Ignore e-mail threads so you never see all the future replies.
  17. Mail tool tips in Outlook 2010 notifies you before a message is sent of issues (OOF, quotas, max message size, etc.).
  18. Apply RMS policies to voicemail messages
  19. Update the mobile Outlook client over the air.
  20. Can restore corrupt database store pages from other HA instances of the database.
  21. Certificate generation wizard in the EMC! No more command line certificate generation

Notes Issue In Outlook Web App (OWA) Continues In 2010 SP1 Beta…

Most of you are familiar with the fact that creating "notes" in 2010 Outlook Web App (OWA) is not possible. Though "notes" is available, when you click the "New" button to create one, there is no option listed. The only options are to create a new message or meeting request.

As 2010 SP1 Beta is out, I tried the same functionality and the story remains the same.

Saturday, July 10, 2010

Installing Exchange 2010 Prereqs automatically in Exchange Server 2010 SP1

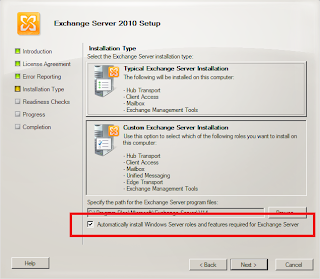
Today I'm going to discuss about one of the new features of Exchange Server 2010 Service Pack 1 which allows us to install all Operating System prerequisites using just the Exchange Setup wizard.

In the past we used these script (http://tinyurl.com/yjqf68y) to do all this process..

Basically, when we use the Exchange Server 2010 SP1 Setup wizard, there is a new option called Automatically install Windows Server roles and fetaures required for Exchange Server. Just by clicking on that option all prerequisites will be installed automatically, isn't that cool? :)


The Exchange Setup program will use ServerManagerCMD in background using a XML answer file to install each Exchange Role prerequisite. All Exchange Setup log files are recorded in the folder C:\ExchangeSEtupLogs and if you look at that folder you will notice a log file for each role (AdminToolsPrereqs.log, CASPrereqs.log, hubprereqs.log, mbxprereqs.log and so forth).

Monday, July 5, 2010

Windows 2008, IIS 7, the Exchange 2007 CAS and IISADMPWD

Essentially as we are mid migration my customer who’s mailboxes still reside on Exchange 2003, however, I have already removed my existing Exchange 2003 FES (Front End Servers) and replaced them with Windows 2008, Exchange 2007 SP1 Client Access Servers.

When one of my Exchange 2003 based user logon to OWA and try to change their password via [OPTIONS] – see below;


Then from the OWA options screen which appears in the right hand window select [Change Password] – see below;


They are presented with the following error (where the usual change password box would appear):


As you can see from the above – the error that is produced is from the IIS 7 web service running on my Windows 2008 CAS server, and it also suggest that the files or indeed the directory that contains the file to perform the password reset are not present.

This was indeed a bit of a “slap head” moment as although my previous Windows 2003 based FES had the IISADMPWD directory enabled my CAS servers which are running on Windows 2008 do not.

I’ll just have a quick look around the web and find out how to enable to IISADMPWD feature in IIS 7 – I found nothing..

I sat there for a little bit scratched my head then thought “What if I copy over the IISADMPWD file from the old FES to the IIS CAS” – this seemed like a crazy but logical idea so:

The basic CAS Prereqs are ASP.net features are enough to support the functionality of the original change password components so on my Windows 2008 Exchange 2007 CAS server I navigated to [c:\windows\system32\inetsrv] and created a directory called “IISADMPWD” – see below;


From my old Exchange 2003 Front End Server (FES) I copied the contents (all the ASP files) of the [ C:\Windows\System32\Inetsrv\ ] directory to the new directory on my Windows 2008 CAS (see above for the directory) - see below for the contents as it should look on your Windows 2008 CAS;


I then open the IIS 7 Administration tool on my Windows 2008 CAS [ START-> Programs -> Administrative Tools -> Internet Information Services (IIS) Manager ] and expanded [ -> Sites ] here I right clicked with my mouse on the Default Web Site and then from the context menu that appeared I choose the “Add Virtual Directory Option” – see below;


Within the dialog box that opened I provided the following information (if you are following this you ensure your settings correspond to the following – when done click on the “OK” button;


After clicking on the “OK” button I was returned to the IIS 7 main interface – where I could now see my new IISADMPWD virtual directory – I right clicked on the new virtual directory entry and from the context menu that appear I chose “Convert to Application” option - see below;


From the dialog box that appeared I chose the “Select Button” located next to the “Application Pool” data section - see below;


From the dialog that appeared from the drop down menu entitled “Application Pool” I choose the “MSExchangeOWAAppPool” option and then clicked on the “OK” button and then “OK” again which returned me to the main IIS 7 admin screen – see below;


From the right hand tree node in the IIS manager I selected my new “IISADMPWD” application directory which changed the main window to display the configurable options – under the IIS section I double clicked on the “Authentication” option – see below;


This changed the main window to look like the following example – here I ensured that the only form of Authentication selected was “BASIC” – see below;


From here I ensured that all settings had been applied – I then reset the IIS services [ Start -> RUN - > IISRESET /noforce ] and then retried accessing the change password feature via the OWA 2003 mailbox via my CAS server which worked – see below;


I ran through the change password process which worked perfectly – cool.